I have only one more teaching engagement left until the end of the year which will hopefully give me some time to work on some much needed new projects. I have had some requests for photos of the projects for the 2012 Martha Pullen schools - so here they are.
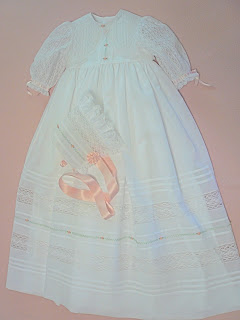
This is the pre day (three day) project. It is a Swiss voile christening gown with a lace bolero style jacket and matching bonnet. Swiss voile is my new favorite fabric for traditional heirloom work as it is lovely and sheer but does not wrinkle near a much as cotton batiste. The gown is sleeveless and I am pleased with the simplicity of the overall look even though there are a great number of details on the outfit. I do not like the dress to look like it is wearing the child.

Here is a close up of the front of the bodice. The bullion roses are worked with DMC 'satin' floss which is really rayon. I like the bit of sheen it adds to a project although there is a learning curve involved when working with rayon floss.

The lace strips on the jacket are worked over a layer of silk organza which gives the jacket a nice amount of stability. The jacket dips down a bit at the center back.

I like to finish off a christening gown with a bonnet although I must admit my own children did not wear their bonnetts because they had so much hair which I could not bear to cover up.
The four day school will include two different projects. The first one is a silk dress with a bit of a different take on a traditional sailor style collar. I like the look of the ecru laces over the darker toned silks. As with the bolero jacket in the christening gown (above) the entire collar and front inset on this dress are strips of ecru laces worked over a layer of silk organza. The front of the belt is lace worked over three layers of silk organza for stability. The belt back is a wide silk organza sash tied into a bow. The project will be offered in sizes 4-8.

 The final two day project is a remake of the one the projects in my book. It's called Daisy Mae and this version is a Dakota pique jacket paired with a lime classic cotton gingham bishop. The embroidery on the jacket is quite simple and quick because the buttons (81 of them!) are doing most of the work. The project will be offered in sizes 6 months thru 3 years.


For those of you who have been asking I have finally started adding some new project kits to my ETSY site. The link is www.etsy.com/shop/gaildoane Thanks for visiting my blog and Etsy site. Happy stitching!


