Saturday, July 16, 2016

Bound Buttonhole Tutorial

I have had several requests for a little picture tutorial of my method for making bound buttonholes. I posted this photo last week on my Facebook page and the Classic Sewing Magazine Facebook page. 
It is a close up of a bound buttonhole made with (somewhat enhanced) mini piping using a piping foot on my sewing machine.  


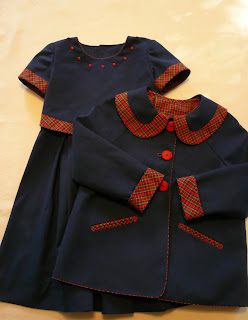
The bound buttonholes are featured on this project which will be a new class in 2017.  The jacket and dress fabric are cotton twill from Fabric Finders paired with a 100% pima cotton traditional tartan from Spechler/Vogel.  The easy fitting raglan sleeve jacket has lots of construction details....bound buttonholes, double welt bias cut front pockets (which look like huge bound buttonholes), bias cut collar overlay, bias cut cuff turnbacks, mini piping on all perimeter edges, and  a pleated back with piped tab. 


The coordinating dress features a bodice front overlay with a bias cut contrast tartan band, bias cut tartan sleeve overlays, piped back belt with bound buttonholes, and buttons all the way down the back.  The hem is bound and shaped to accomodate the A-line of the pleated skirt.

Project kits will be available in several color options - should be something that appeals to everyone.


Here is a picture step-by-step of my methond for making the bound buttonholes.  

1.  Clearly mark the placement of the buttonhole(s) on the right side of the fabric.  For a 1" button (for the  jacket) I marked a 1 1/8" buttonhole and for a 1/2" button (back belt on dress) I marked a 5/8" buttonhole. Work over interfaced fabric.   


  2. Draw in two more lines each an accurate 1/8" away from the center placement line.


3.  Make enough piping for the length of each buttonhole plus 1" (x's 2).  For this weight of fabric I found using two strands of filler cord instead of one made for a studier, better proportioned bound buttonhole.  I did not adjust my needle position as close to the cord as I normally would for single strand piping.  Trim the seam allowance down to an accurate 1/8".  I checked and it appears none of the piping rulers on the market will cut a seam allowance down to 1/8" so you will have to have a steady hand to make an accurate cut.


4. Cut the piping the length of the buttonhole plus 1".  Lay the seamline of the piping on the outer line of the marked buttonhole.  The raw edge of the seam allowance should just touch the center marked line.  Using your piping foot and adjusting the needle position as necessary to stitch close to the cord, stitch (1.5L) over the seamline on the piping  EXACTLY between the two marked vertical edges.  Backstitch at the beginning and the end.  Repeat for the second strip of piping.  The two 1/8" seam allowances should just touch on the center line.  I prefer to use the open toe applique foot to make piping on my Pfaff (rather than the mini piping foot).  One 'toe' on the foot is exactly 1/4" wide which is super helpful when lining up the strips for the buttonhole. I love my Pfaff - it has 29 needle positions which allows superb accuracy when working with piping.   


5.  The back should look like this,  Slash down the center of the back to within 1/4" at each end. Make a 'Y' cut out to the end of the stitching at each end,  


6.  Pull the piping strips through to the wrong side.  Gently press.  


7. Fold the jacket front out of the way and stitch down the little triangle at each end of the buttonhole.  Trim the excess piping down to 1/4" at each end of the buttonhole.  


8.  The following photos show the method I used to finish the lining side of the bound buttonhole.  I used silk organza with the lining window 'patch'. 


Tuesday, April 12, 2016

A Little Something Tailored

New project..... something that  might appeal to the more tailored young lady in your life.  A 3/4 length cotton pique jacket and coordinating A-line sailor collar dress.  Who does not like a red jacket?  It will pair beautifully with denim or white jeans for a more casual look. 


The red cotton pique jacket is fully lined (partially with the red pindot pique and partially with a white poly lining for ease slipping on and off) and features many precision construction details. Can you guess what is behind the two angle set piped bows?   Hint.... fully constructed single welt pockets with an angle cut underlap. 


The construction of the jacket back allows for a half belt, embellished with another piped bow, and a wearing ease pleat.  The sleeve lining has a turn back of the red pique which builds in at least a year of growth room for most girls.  


  The simple fully lined A-line dress, constructed from a red pin dot pique, is a nice diversion from full skirts and puffy sleeves. The piped sailor style collar curves into a Peter Pan style in the back.  The  piped set in sleeve offers a good challenge to incorporate enough ease without puckers or gathers across the cap of the sleeve. 


Welt pockets (single or double) can be quite challenging to perfect.  The following is my preferred method for constructing single welt pockets.  These instructions are part of one of my notebook classes titled 'Just Pockets'. 


Single Welt - Sample Swatch

1. Base Fabric:  10” long by 9” wide
    Base Fabric Interfacing:  10” long by 9” wide
    Pocket Lining:  7” long by 7” wide – cut 2
    Welt Fabric:  2 ½” long by 5 ½” wide
    Welt Interfacing:  2 ½” long by 5 ½” wide
    French Fuse:  3” long by 7” wide

2. Fuse interfacing to the wrong side of the welt.


3.  Right sides together, sew the short ends together. Trim and clip the corners.


4.  Turn right side out and press.


5. Measure down and draw a line 3” from the top edge of the base fabric.  Machine baste along this line.


6.  On the wrong side, center a 3” by 7” rectangle of French Fuse over the basted line and fuse in place.


7. Right sides together place the welt so the raw edge laps ¼” over the basted line.


8. Stitch on the welt taking up a ¼” seam allowance.  Begin and end EXACTLY at the ends of the welt.  Back stitch very carefully so no stitches extend beyond the welt.


9. On the right side, center one of the pocket lining squares over the welt, matching the top edges.


10. Flip the fabric over to the wrong side and stitch EXACTLY on the first stitching line.  Backstitch carefully at the beginning and end. 


12. On the right side, pin the second pocket lining square so it overlaps the previous stitching by ¼”.  Pin in place.


13. On the wrong side, draw in a line ½” above the original line.  Start and stop the line ½” shorter than the original line below it.  Stitch on the new line backstitching at the beginning and the end. 


14. On the wrong side, draw a line in between the two stitched lines. Draw two lines diagonally into the corners.


15.  Cut along the drawn line through the interfaced base fabric and the French Fuse only.  Do not cut through the pocket lining or the welt.  Cut diagonally into the corners. 


16. Pull the two pocket lining squares through to the wrong side through the slashed opening.  Press the welt carefully.  It is helpful to do the pressing over a ham. 


17. From the wrong side and with the base fabric folded back out of the way carefully stitch diagonally over the folded back pie shaped wedges at each end of the pocket. 


18. Continue stitching down the side of the pocket.  The lower edges of the pocket squares will not match.


19. Stitch across the bottom of the pocket and up the other side cutting in on a diagonal line to stitch over the folded back pie shaped wedge on the opposite side.


20.  On the right side, carefully stitch down the ends of the welt.